High quality home studio setup with Michael Abramoff
As the world continues to embrace digital interactions and events, many people have asked me how I manage to achieve such high quality audio and video during online meetings, interviews, etc. Let me share how I achieved my high quality home studio setup, and how you can too.
My goal for my home studio was to be able to look people in the eye during remote meetings, while also seeing them, for the entire workday (i.e. 10 hours or more). Since the beginning of the pandemic I have been optimizing a better solution that offers professional-quality audio and video, is comfortable to work with for an entire day, and allows me to be face-to-face, even during a simple zoom call.
To help with this I started using a teleprompter setup, such as those used during the state of the union addresses, live tv, etc. Many different teleprompter options are available, but they typically require a reformatted presentation, such as image inversion, so that the image appears upright when looking at the beam splitter (a 50% mirror). Without this setup, live use of apps, including PowerPoint, during a presentation are not possible while looking at the camera.
The requirements:
- Studio quality video, better than the standard camera in a laptop or USB connected web camera
- Studio quality sound
- Studio quality lighting using common lighting setup for single subject photography
- Ability to look at my audience for at least 10 consecutive hours a day without getting fatigued
- Suitable for desk setup (i.e. works without requiring me to stand)
- Compatible with all common teleconference apps as well as all major cloud-based podcast recording apps
- Quick connect for laptop – single connector allows me to quickly swap out my laptop (Microsoft Surface 4) and reconnect when needed
- Compatible with office space in the home (i.e. no special room modifications)
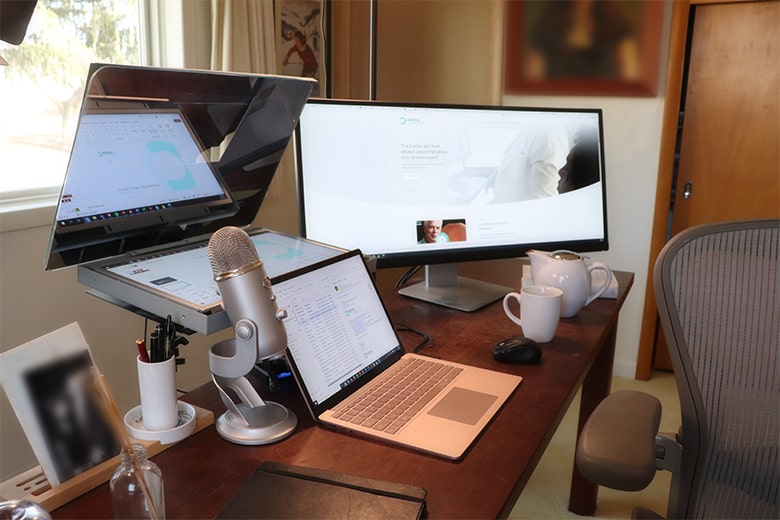
I have been using this setup for over a year now, and it allows me to attend meetings, write, and code efficiently, as well as to look directly at my audience when teleconferencing or being recorded. The major components I needed are:
- 3 screen setup
- laptop screen, primary display
- curved 34” screen, secondary display
- 5” “presentation” high brightness screen, tertiary display
- Large beam splitter with stand. It reflects the tertiary display allowing me to perceive a “normal display” with the audience, while the camera behind this beam splitter shows me looking straight into the camera.
- HDMI or USB-C video inverter that can flip the input image top-bottom, in order to rectify the image reflected by the beam splitter
- 3-point LED lighting with adjustable color balance with each light on individual stands
- Digital SLR camera at face level when seated in office chair so I can look at my audience or presentation while looking at the audience. It is set to autofocus so I can approach or sit back without the audience seeing me defocused.
- USB high quality microphone
They are setup as follows (see below for full parts list):
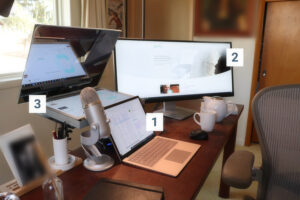
Three-screen setup with my laptop screen (1) in front of me, the curved 34” tertiary display (2) to my right and the 18.5” “presentation” high brightness display (3) in front of me in a laptop mount.
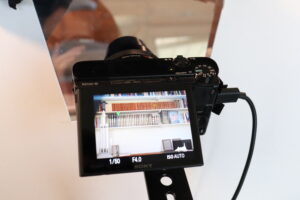
The SLR camera, a Sony Cybershot, only requires a micro-USB connection to the hub for power and signal. It is attached to the support bracket directly in front of me, which in turn is mounted on the camera stand and centered within the beam splitter mirror.
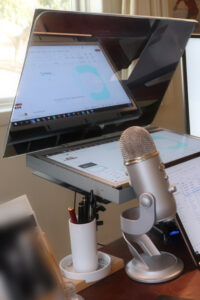
The beam splitter mirror is mounted using a Nikon mirror mount at 45 degrees. The beam splitter shows the “top-bottom” inverted image from the secondary display. This needs to be a high brightness screen, because 50% of the light is not reflected by the beam splitter. Before this high brightness display, I had a standard 15” display, but that led to a dim image that is tiring to look at for an entire day. With the high brightness display there is no tiring from trying to read low contrast presentations or look at low contrast faces during virtual meetings.
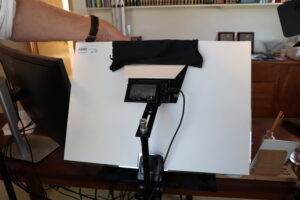
To remove reflections from the environment, I added a cardboard back cover and baffle to shade the camera opening. The image on the secondary display needs to be top-bottom inverted or flipped electronically. So far I have not been able to find a high brightness display that can do this, so external hardware is required. My hope is ultimately to make this part of the secondary display electronics.
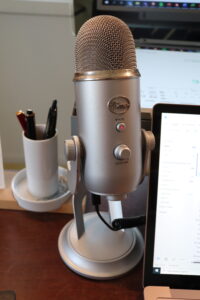
The microphone is at chin level to my left so when I look left I speak straight into the microphone. While studies have failed to show an association between telling the truth and looking to the left, the urban myth persists, so I prefer to be seen looking to the left rather than to the right.
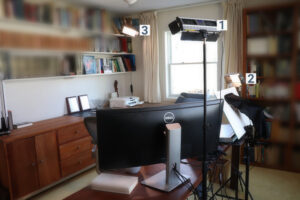
Lighting is a standard 3 point layout, with the right facing light at 2’ above and 2’ to the right of my head, with brightness set at 50% and color balance at 34, the left facing light is at 1’ above and 2’ to the left from my head, set at 25% brightness and color balance at 34, and the rear light is behind me, 5’ above my head and 8’ to my left at 50% brightness and color balance 34.
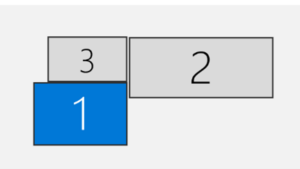
In Windows, the displays are laid out as follows 1: laptop screen, 2: curved 34” screen, 3: high brightness mirrored screen.
This setup has come together with much trial and error since the start of the pandemic. While I will continue to make iterative improvements, it is serving me well and I wanted to make it available to others. I have been experimenting with several ideas to make the camera/beam splitter unit track me when I move or even walk around, but the current state is not good enough for primetime yet. I hope you find this helpful. Let me know by email if you have problems or are able to suggest further improvements.
Parts list:
- SLR: Sony Cybershot Rx100 Mark VII, set to “movie”, requires micro USB for power and video signal
- Microphone: Yeti Blue
- Camera Stand: Impact Air-Cushioned Light Stand (Black, 8′) LS-8AI
- Mirror mount: Nikon 7070 Car Window Mount / Adjustable Glass Mount
- Support bracket for camera: Desmond Stereo Camera Bracket
- Support for screen: On-Stage MSA5000 Laptop Mount
- Display flipper: HDMI MirrorBox with HDMI in and out, or Decimator MD-HX with USB-C in and out
- Mirror: 14″ x 20″ Teleprompter Mirror – 5/32″ Thickness – 50R/50T – Rounded Corners
- Mirror backcover: Canson Stygian Black Matte 16” x 20” with hole cut to size
- Mirror backcover baffle: Velvet Velour Black Ben Textiles cut to 20” x 10”
- Mirrored Display: Accuview OFU185J, 18.5 “ ruggedized 1000 cd/m2 open frame LCD
- Tertiary Display: curved Dell 34”
- Dock: Microsoft Surface Dock 2, with specs: dual 4K at 60 Hz, 2 USB-C® (15 W), 2 USB-C® video display enabled (7.5 W) (both used), 2 USB-A 3.2 (7.5 W) (both used)
- 3-point lights: Bescor Photon 3-Light Kit with stands, 10 x 3.8 x 1″ LED Panel 3200-5600K, set to 51, 23, 30 intensity respectively
- Converter: USB hub with USB-c input, HDMI out (used), USB-A outputs (1 used), HDMI output (used)
- Auray 5/8″ Male to 3/8″ & 1/4″-20 Female Combo Reversible Thread Adapter (Steel)
- Glue stick (for attaching the baffle to the mirror back cover)
- Cables:
- Camera to dock: USB micro to USB
- Converter to flipper: HDMI male
- Flipper to display: HDMI male